
Revolutionizing Visual Effects and On Set Visualizations with Ghost Frame!
If you’re here for the Nuke Gizmo, you can grab it from Nukepedia (link coming soon) or github.
This is Part I of our journey, where we’ll dive into the concepts and methods to create a tool that maximizes the Ghost Frame process for both hero and matte frames. Check out Part II (coming soon) where I cover how to use the gizmo.
A Quick Overview
Traditionally, live-action footage delivered to comp was shot on green screen. We’d spend a few hours keying it out and move onto comping in our CG or matte paintings or whatever. But with the advent of volumes, everyone wants to shoot with the backgrounds already embedded in the footage. This is great for everyone accept for the VFX artist. There is still plenty of work to do to each shot and generally we need the elements to be separate to do our work. That means roto, and lots of it. The Mandalorian is famous for shooting on a volume, which made Mando’s armor look great, and then rotoscoping him out of every frame to change up the background a little or add volumetrics, or in some cases, swapping out the whole background.
Shooting Ghost Frame
The core concept is deceptively simple: instead of shooting at the standard 24 frames per second, the camera captures footage at 48 frames per second, with every other frame being a dedicated “matte frame” shot against a blue or green screen. This gives on set VFX artists instant access to both the married footage AND the matte.

In order to not drive everyone on set completely mad Hannah Schilsky of LUX wrote a custom module that allows only the frustum to flash the matte.
Sky Ferren and Alex Coppedge wanted to test live on set compositing to speed up the workflow and give directors, DP’s, actors and producers immediate access to VFX looks. They brought ITAKI on board along with LUX to shoot a the LUX stage at Trillist to shoot a spec piece written and directed by Alex.
The idea is simple. Shoot some ghost frame footage and deliver, in basically real time, both the footage and the Unreal project to onset comp artists who would do live composites bringing in all the elements we’d normally not see until much later in the process.
This definitely sped up workflow and some interesting challenges arose including dealing with timecode, onset editing and clip trimming, color matching problems and some other things that Sky and Alex address in their coming white paper. (replace with link when available)
The Post Workflow :
By shooting on a volume we already we get our lighting and camera move for free. But could we also get a usable matte?
At first glance one would think “ok, great, we have the hero plate and a matte plate, we’re good right?” But we have one big issue. If our hero is moving, as they tend to do, then the matte frames don’t exactly match our hero frames.
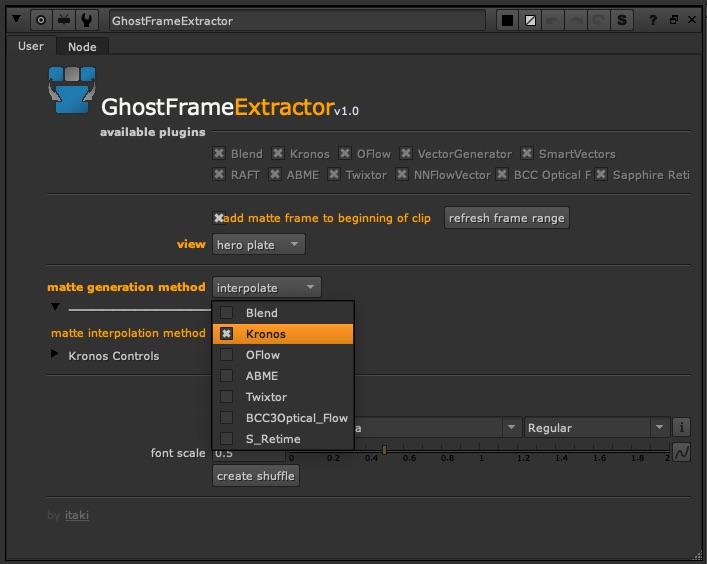
The Interpolation Method
By this point most of you amazing VFX problem solvers have figured out a solution to this problem. We can simply drop Kronos on the matte footage and slow it down by half. This interpolates new matte frames that should match the hero frames.
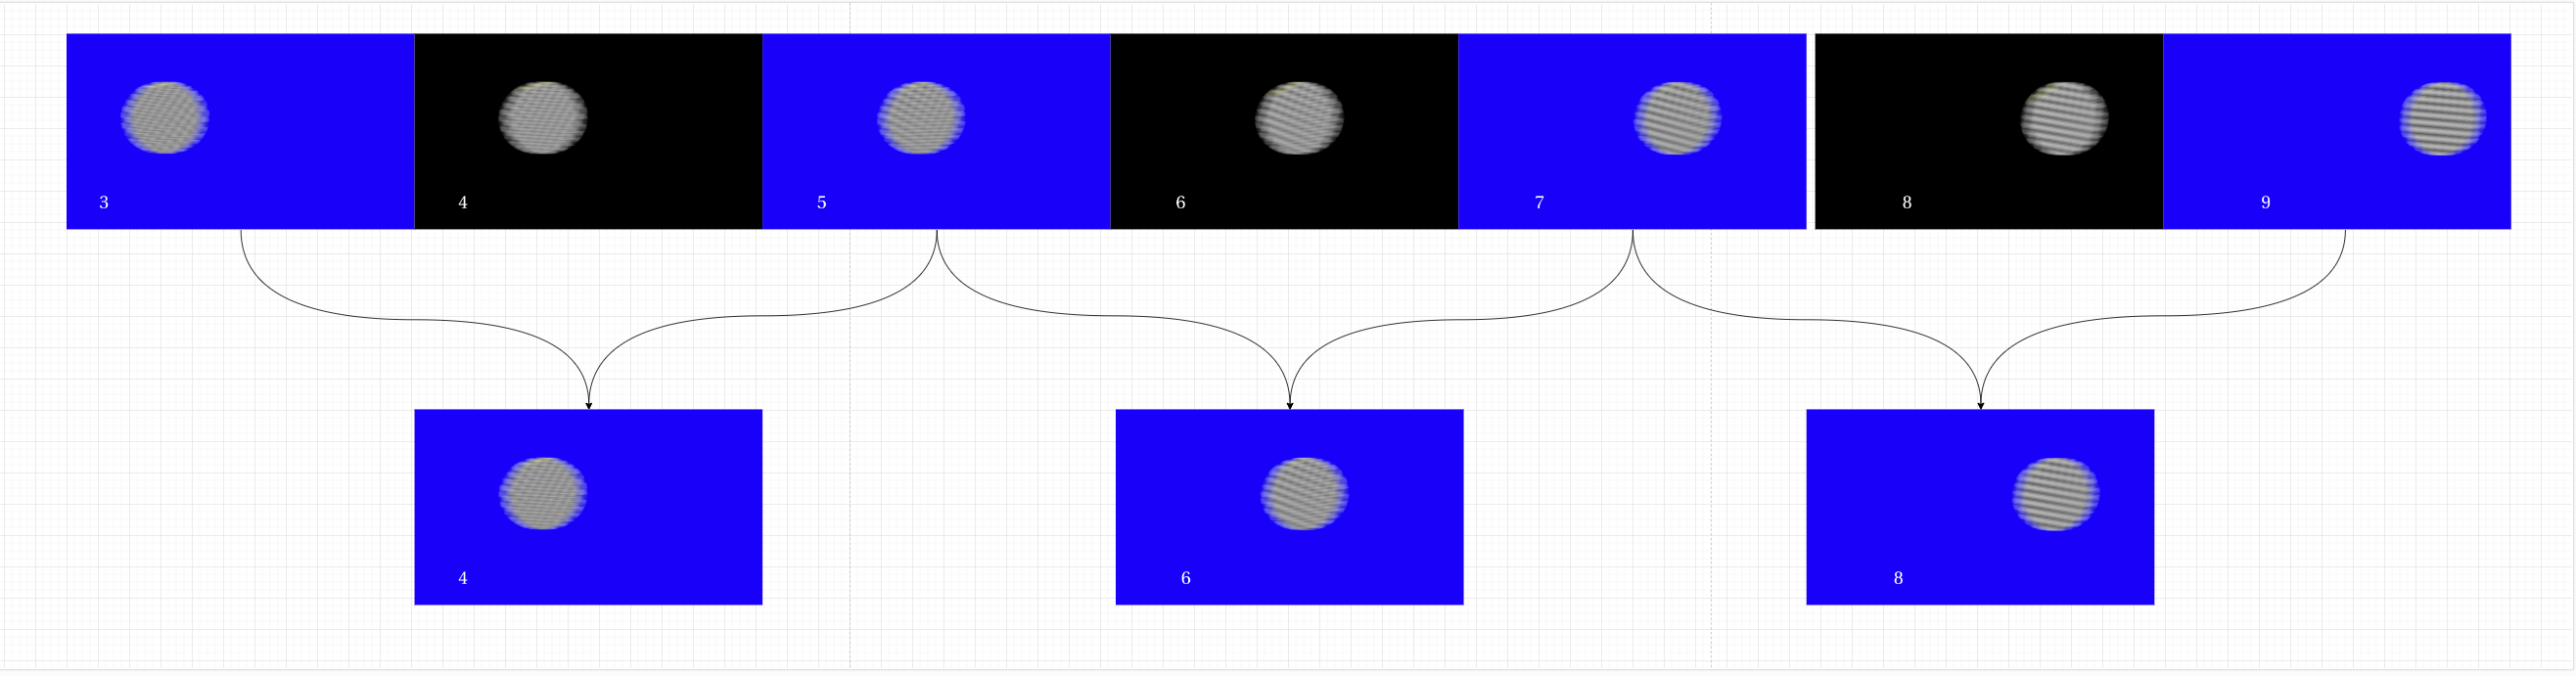
So here’s our setup. We’ll split the footage into 2 streams. The hero stream and the matte stream. Then we’ll slow the matte down to 50% of it’s original speed. Then we’ll extract just the newly generated frames.
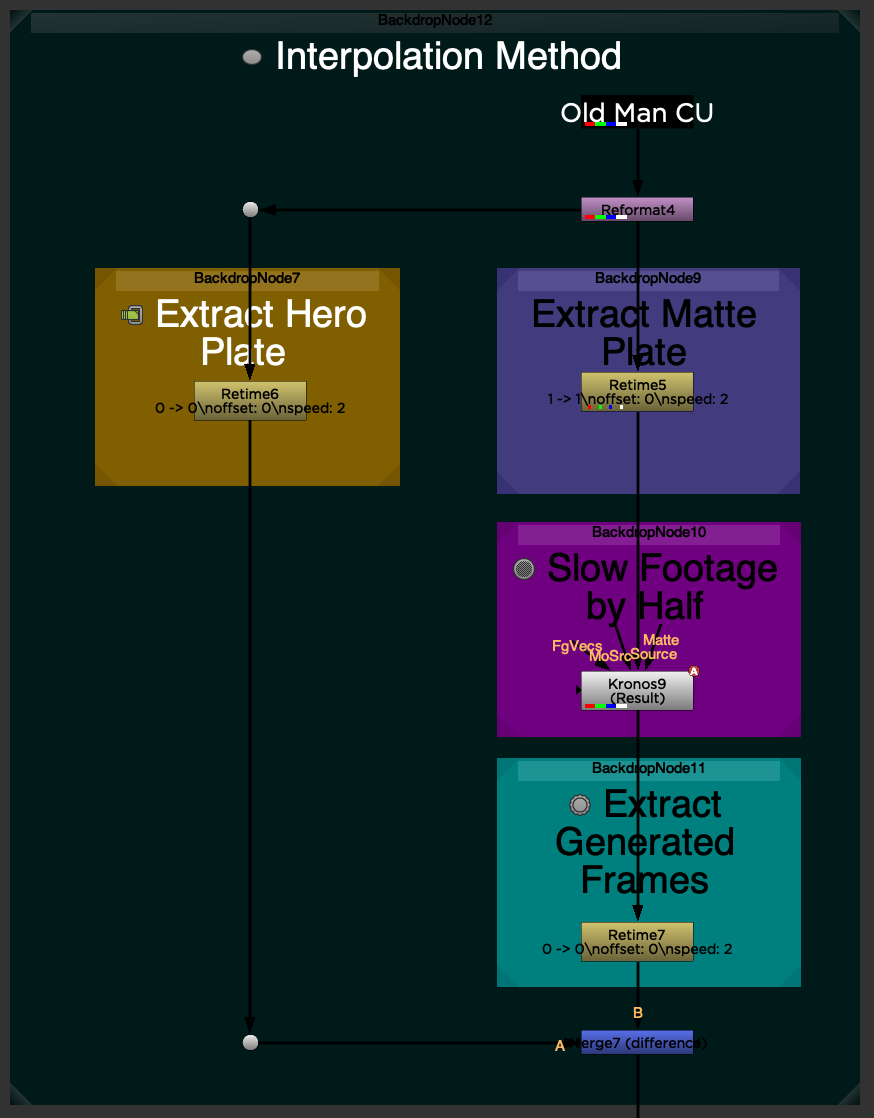
Note: There is a bug in Kronos and OFlow where when you drop the node in the pipe and set it to .5 speed, it miscalculates the length of the new clip by one frame. For example if your clip is 50 frames long, it will lengthen the clip to 100. But since the last frame is a real frame and not a interpolated frame, it will be off by exactly 1 frame. The last real frame should be 99 and the final interpolated frame should be 100. Because of this, we’ll need to explicitly tell Kronos what our frame range is by setting keyframes. This is huge pain but in the gizmo I wrote some python code to do this automatically.
When we difference the interpolated matte plate with the hero plate we see our end result.
It’s good but not great. I think we can do better.
Kronos is great for quick timing effects but it doesn’t really cut it when actually having to match the real frame.


But we are on to something so let’s maybe look at a few different ways of interpolating new frames.
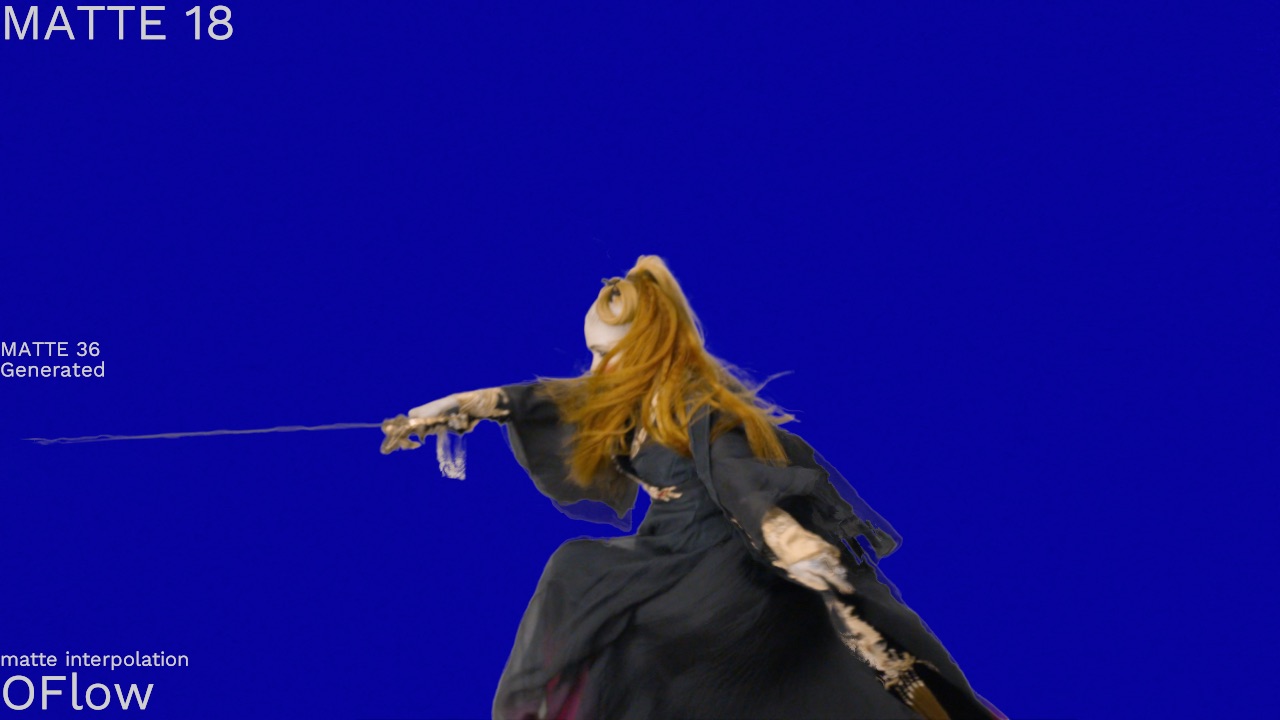
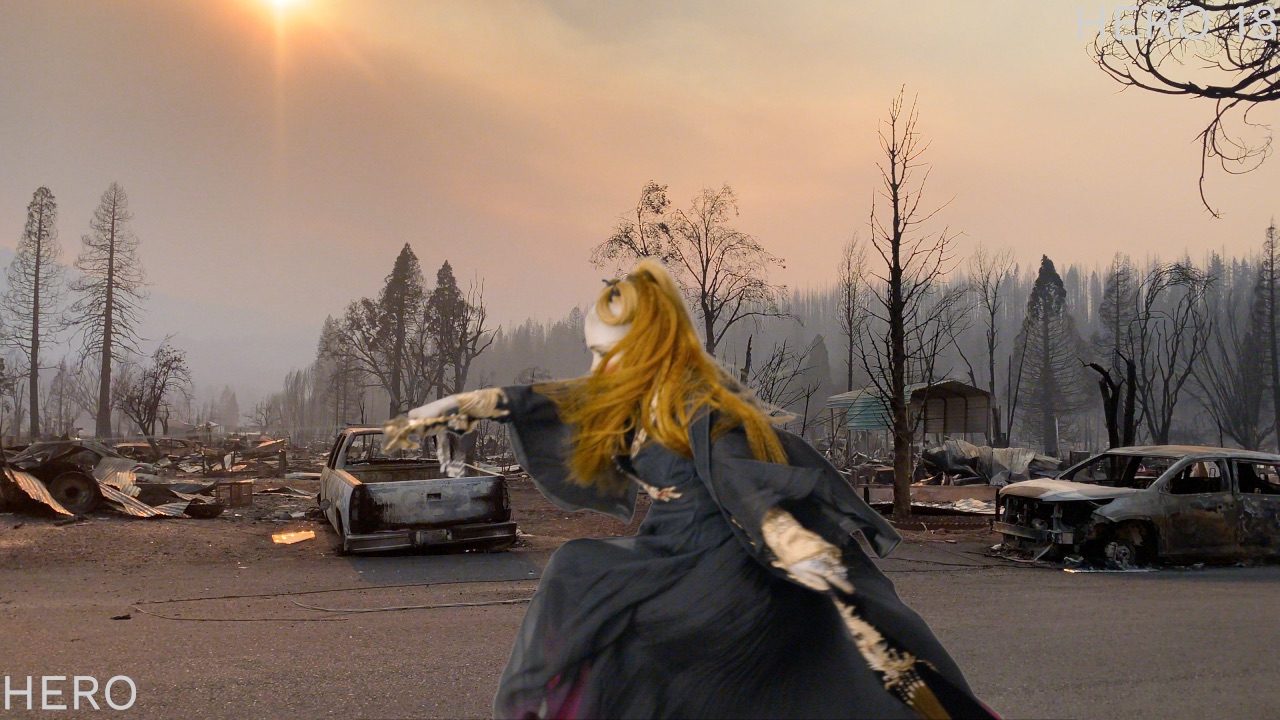
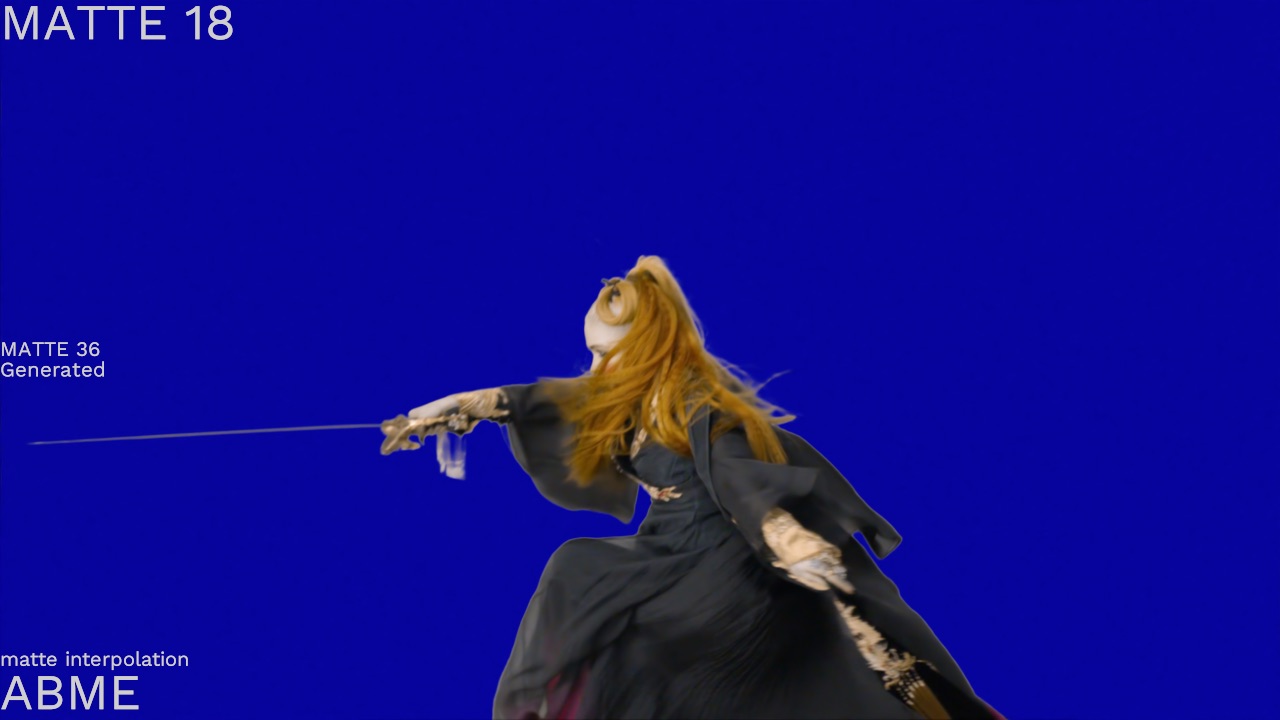
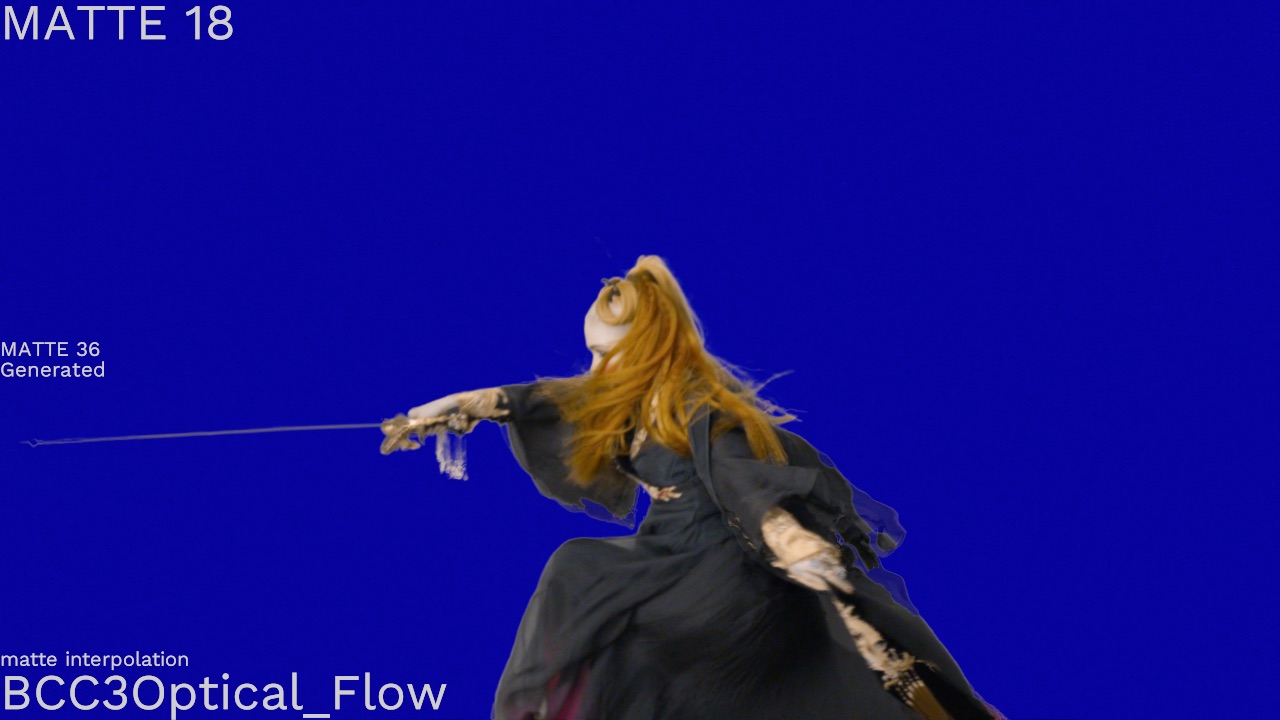
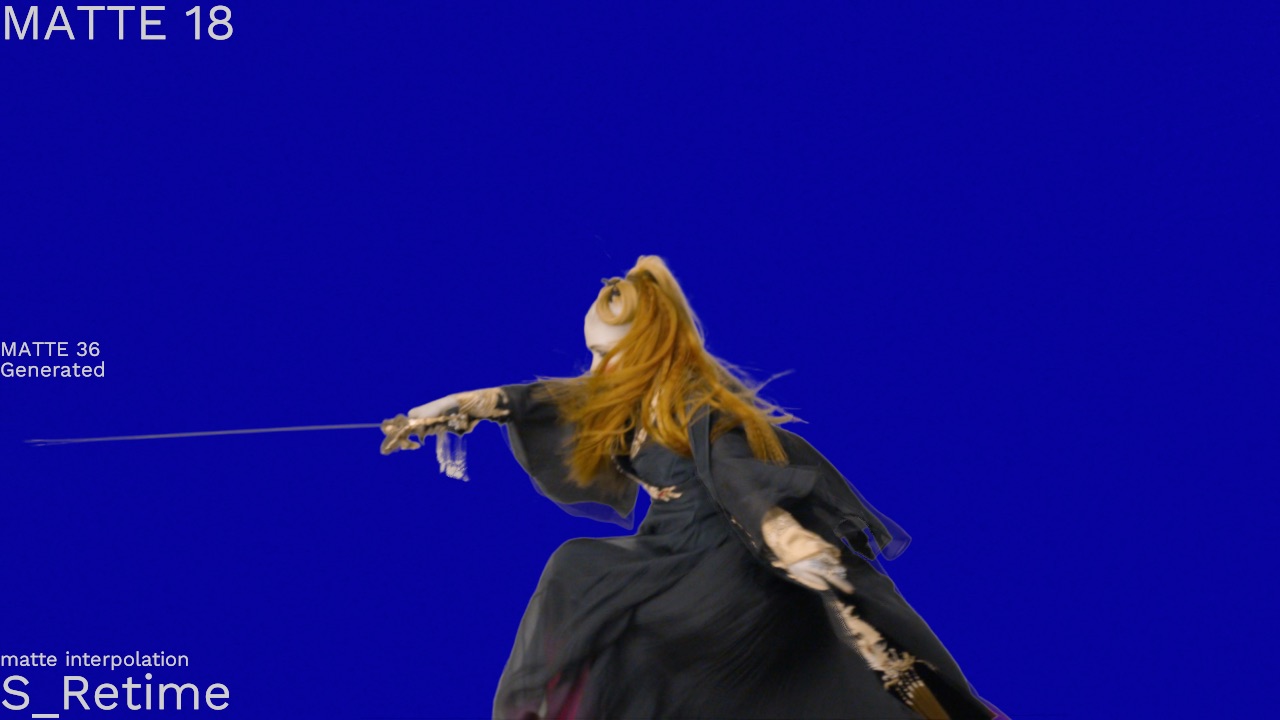
For this I generated some new footage that will help us better see what’s going on. This is some free stock footage that Grimes released a few years ago which, for dramatic effect and add importance to what we’re doing here, I very quickly married to some free stock footage of California after some wildfires. Particularly watch the blades straightness, her sleeve and the bits of her hair.
Let’s review some of tools we have for interpolating frames.
OFlow is the older not so fancy brother of Kronos. It uses motion vectors, but tends to be splotchy. It’s very fast and is available in all versions of Nuke.
Kronos is the go to tool for retiming in Nuke. It also uses motion vectors, but tends to smear a bit. It’s very fast and only available in NukeX and Studio

ABME (Asymmetric Bilateral Motion Estimation for Video Frame Interpolation) uses machine learning to estimate motion. It does exactly one thing which is slow footage down by half, which, luckily is exactly what we want to do. However, it’s super slow. Even with my 3090, it was painful to sit through and would never work real time on set. The quality is pretty good on most footage but it’s not something I would use. It’s available in the cattery. If you have a couple A800‘s crunching away in your machine, this one might be worth a try.
Twixtor by RE:Vision is a paid plugin specifically designed for retiming footage. I’m using version 8 beta which has their new DNN model. And holy smokes guys, it’s both super fast and does the best job by far. I’m literally blown away by the speed and quality. I don’t currently have a licensed copy so the examples all have their watermark. But if were to setup a rig for on set ghost frame work, I’d definitely spring for this plugin.
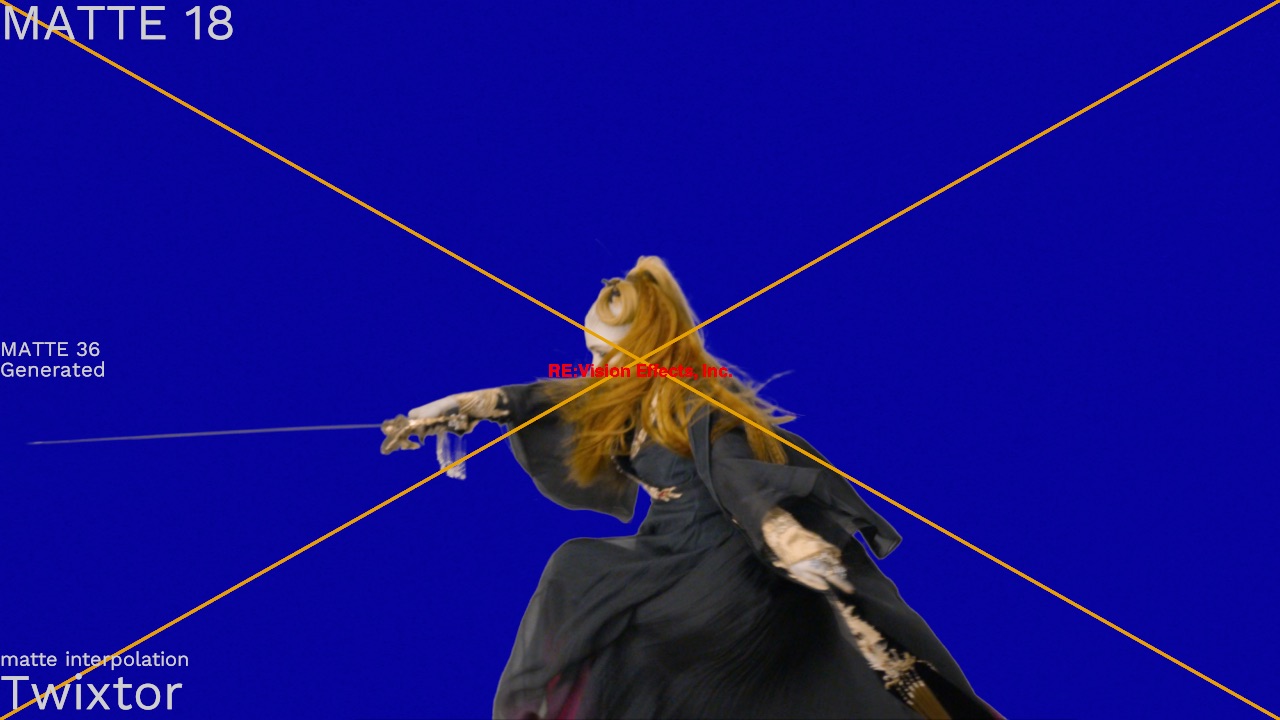
Boris has a retiming tool in their Continuum collection called “BCC Optical Flow“. I’m pretty sure it was just an afterthought because it does a pretty poor job of retiming every piece of footage. It uses motion vectors, but sometimes will just explode them all over your footage. Particularly look at the back side of Grimes’ gown.
Boris also has a retiming tool in their Sapphire collection called “S_Retime” which is a pretty good tool. I’d say it compares to Kronos and may even do a better job with certain types of footage. In the below example it did not do that good of a job but in most other tests, it’s pretty fair.
Initial Conclusions
So this seems like it would have been a pretty good place to quit and honestly if I had installed Twixtor 8 earlier on in this process, I may have stopped here.
Between the free Kronos and the totally reasonably priced Twixtor, and knowing that we’ll probably end up rotoing a few frames here and there anyway, we’ve sitting pretty good. And, especially for on set compositing, it’s going to be just fine.
But I got to thinking, maybe we can do better?
We actually have the missing frame. Only it’s a hero frame and not matted, but maybe we can extract some information from it?
I decided to approach this from a different way and look not so much at the matte frames, but at the hero frames. The hero frames are already a pixel perfect representation of what’s on screen. So I was thinking maybe we can extract the motion information from the hero frames and apply that motion information to the matte frames. And since the motion information expressing where the pixels should be would be coming from the actual real hero frames, it should be dead on. Or maybe at least a bit closer.
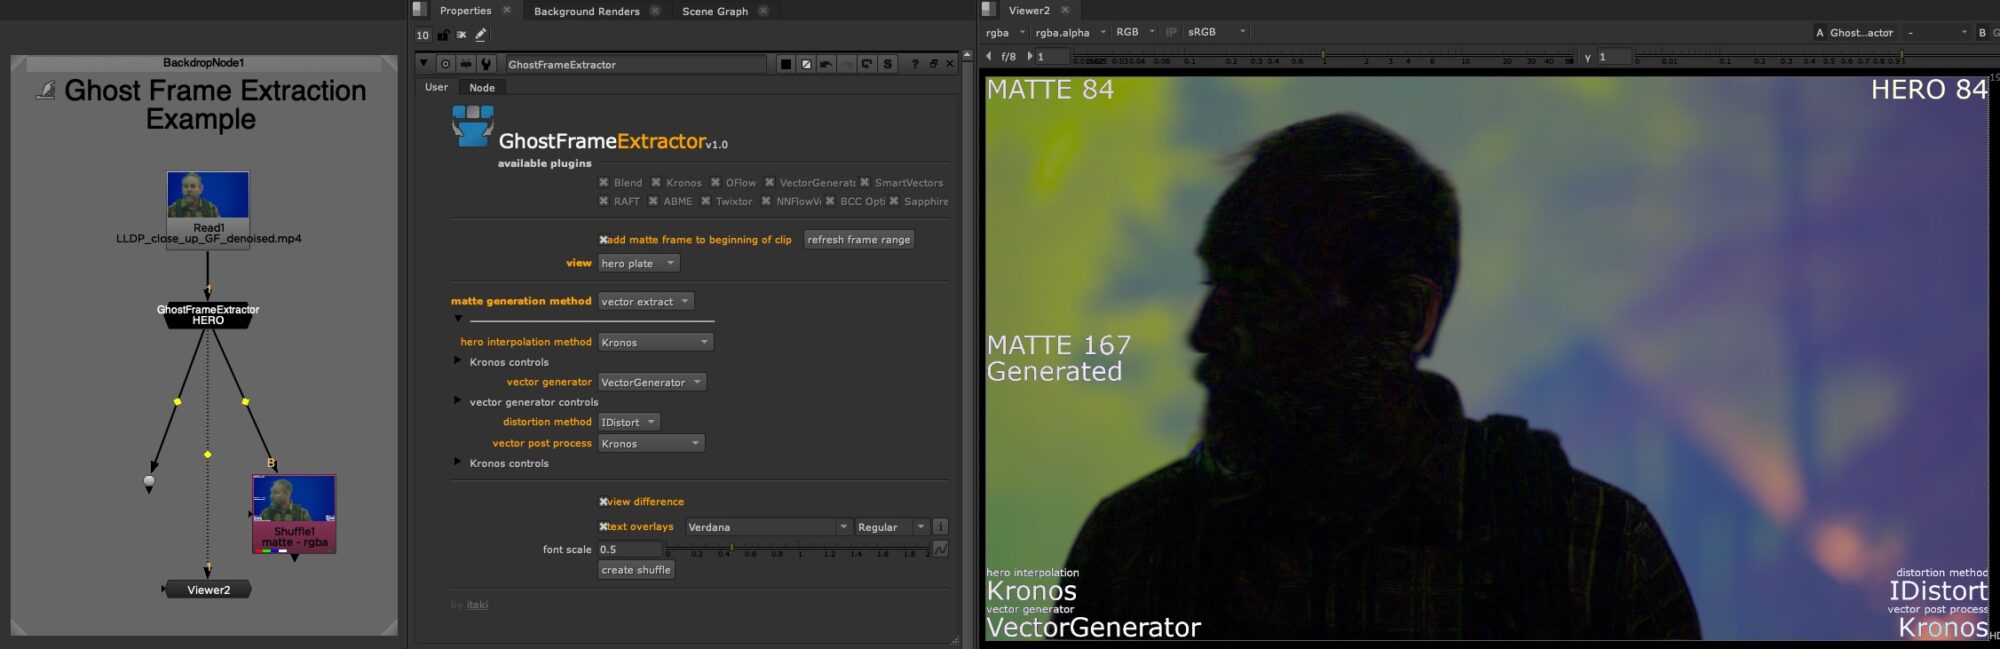
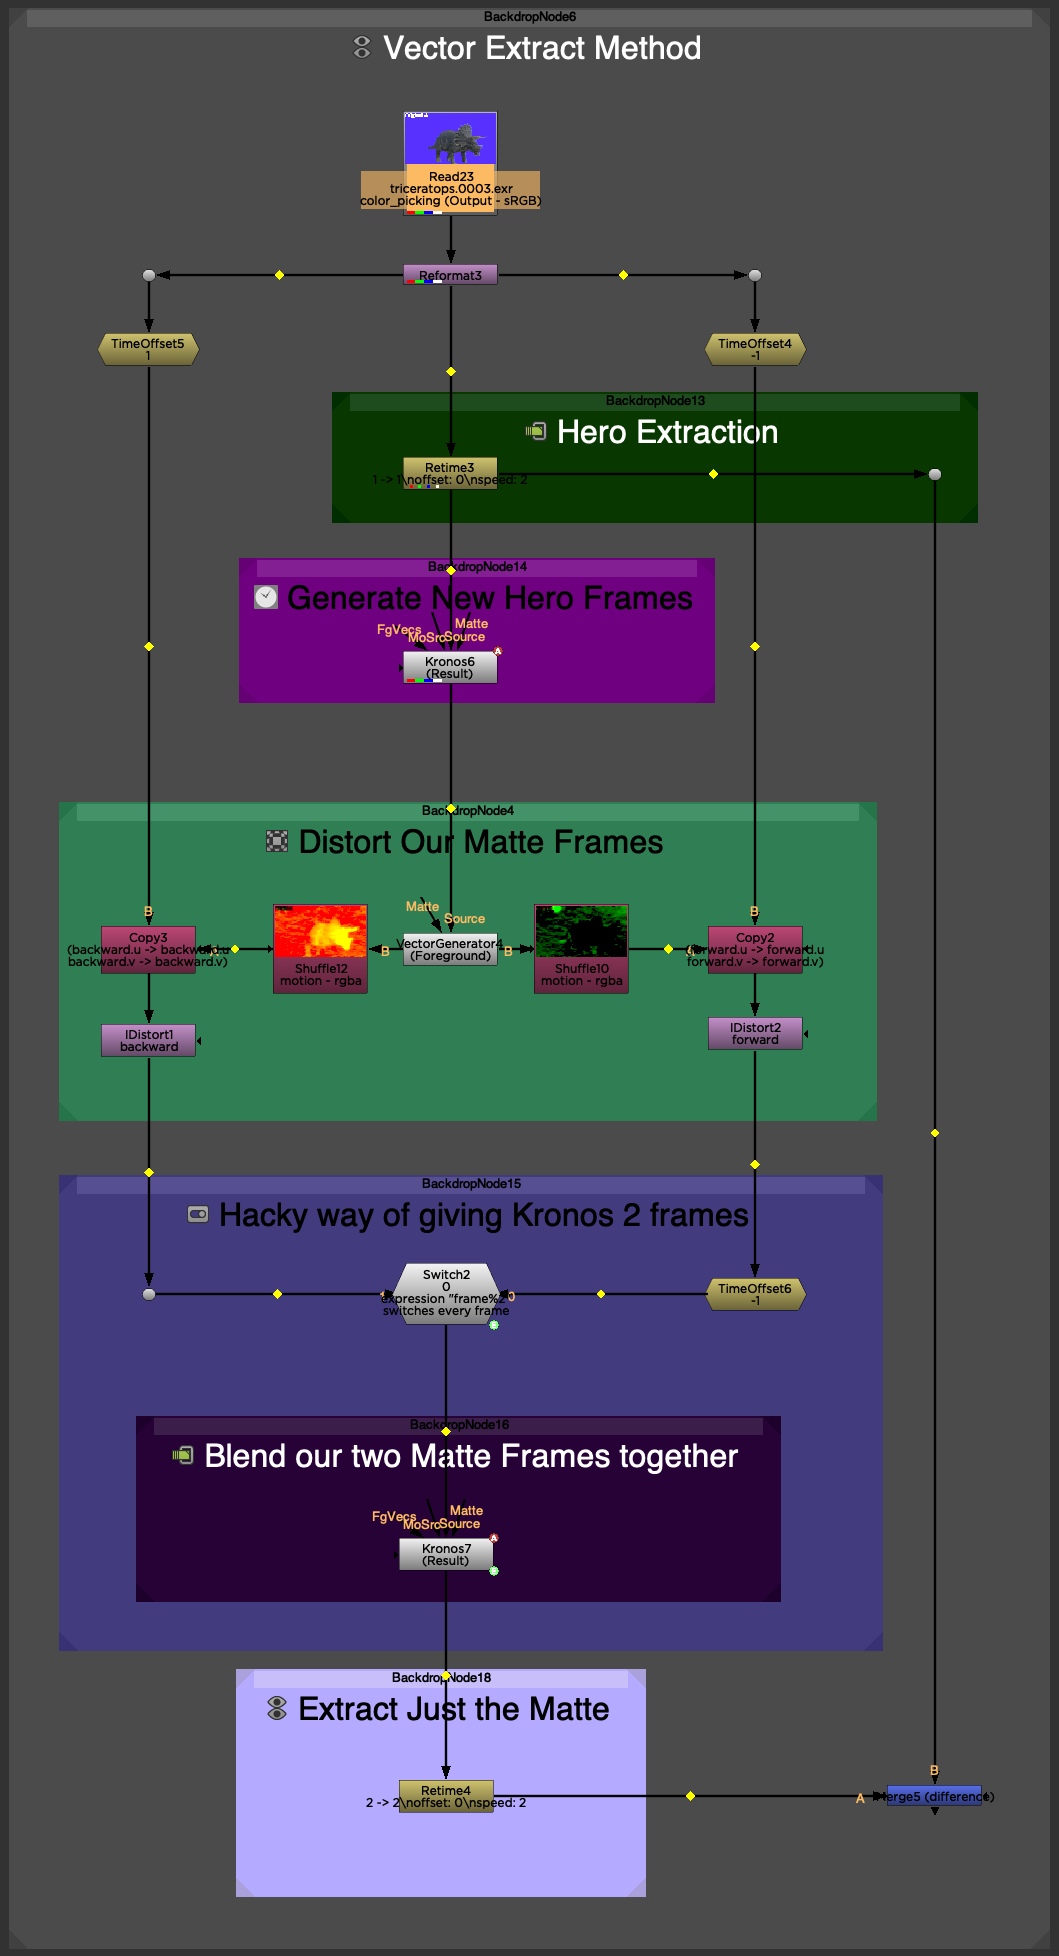
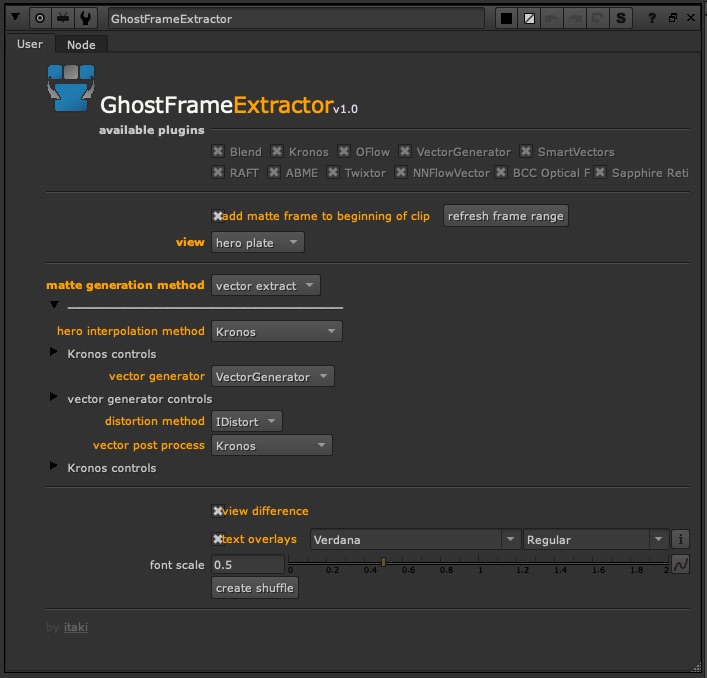
The Vector Extraction Method
Nuke has both a VectorGenerator node and a SmartVectors node, so I decided to start there.
Here’s some facts about these nodes I didn’t know until really digging into them. The most important being that they both create exactly the same vectors for the forward and backward channels. I had always thought they were different because if you difference the ‘motion’ channel from a VectorGenerator with the ‘smartvector_f01_v01’ channel, they are wildly different. But SmartVectors are set up for change over time, not change per frame. This why it’s so nicely paired with the VectorDistort node which needs a reference frame. However, you can convert SmartVectors to motion vectors very easily with the VectorToMotion node. When we do this, we see that they are exactly the same.
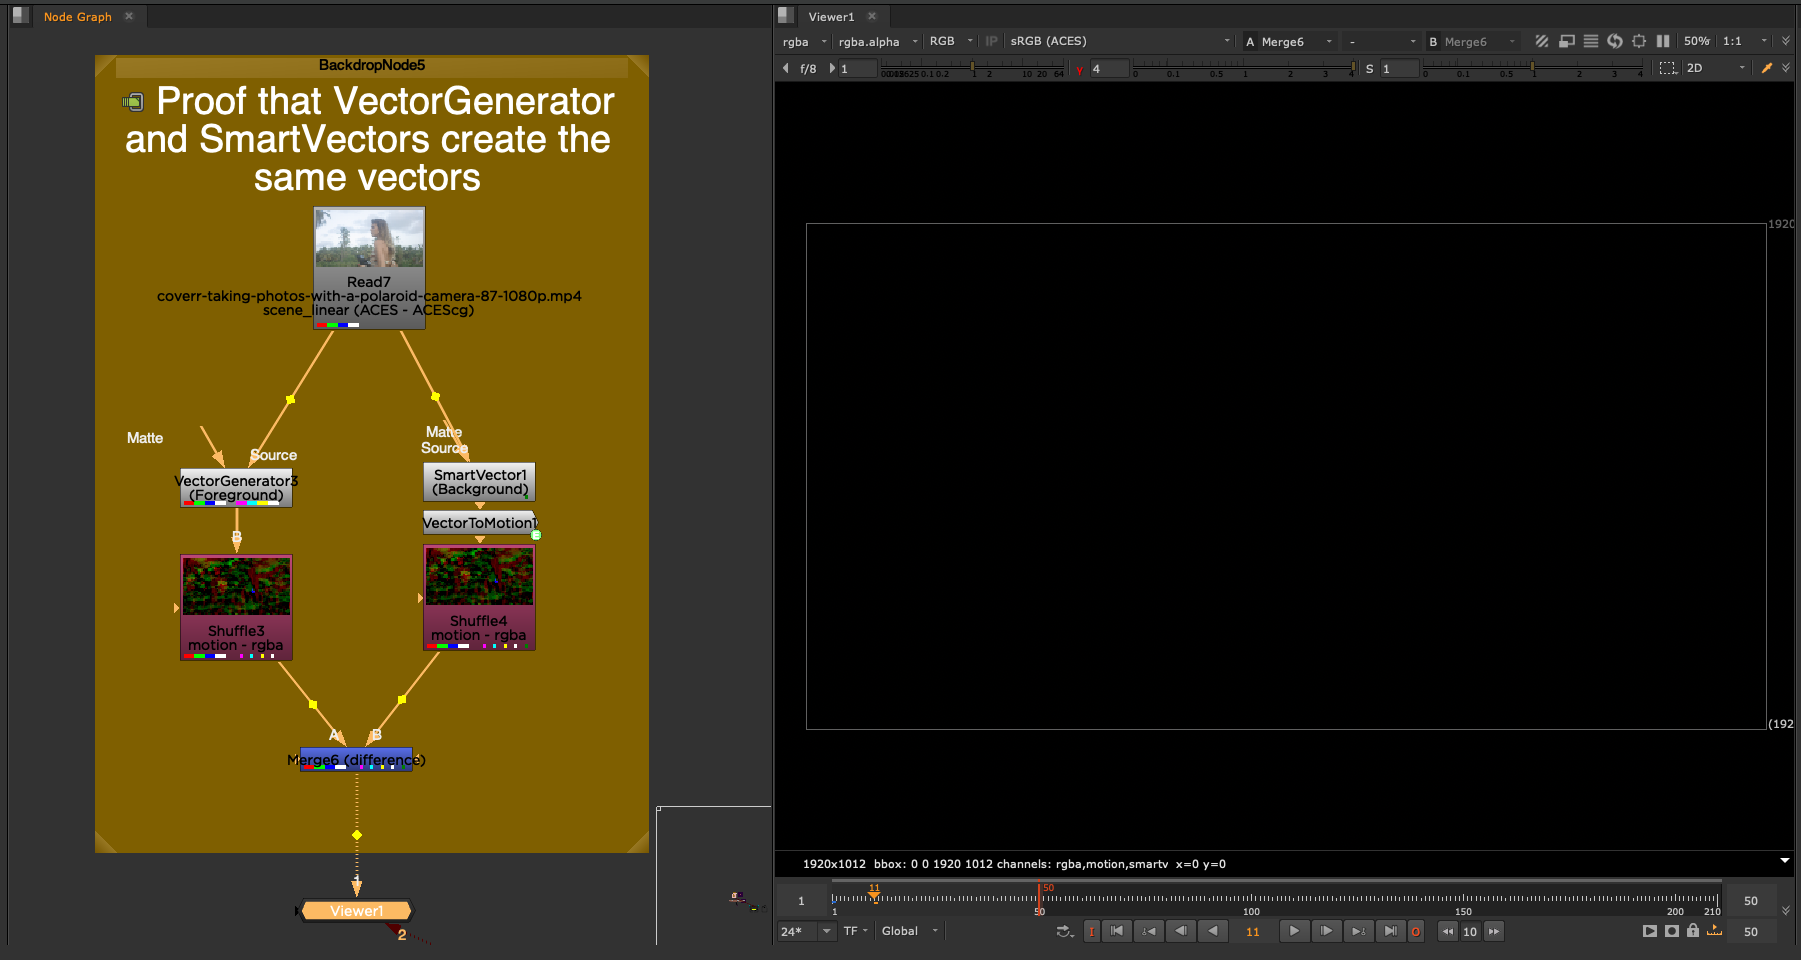
The important point to note here is that the SmartVector node creates more vectors for further frame distances, namely 2, 4, 8, 16, 32, and 64 frames away in either direction. So it’s generating 14 vector fields for each frame instead of just 2.
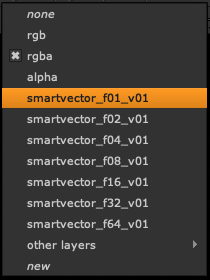
Since VectorGenerator and SmartVectors generate the same result and we don’t really need all these fields, we should just stick with the VectorGenerator and lose the overhead. (note: I left SmartVectors in the gizmo for completeness, but you really shouldn’t use them)
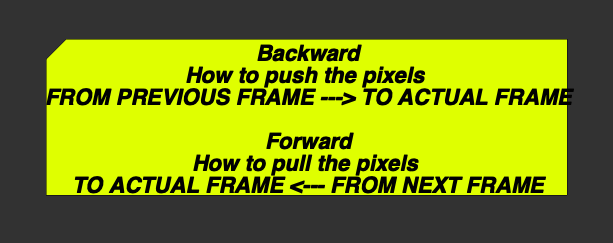
Finally, the naming convention of the motion channel is a little unintuitive. You’d think backward would be the vectors from the current frame to the previous frame, and forward from the current frame to the next one. But the inverse is true and I didn’t say opposite. Rather, ‘backward’ is actually is from the previous frame forward to the current frame. Likewise ‘forward’ is from the following frame backward to the current frame.
Alright, so we’re ready to go.
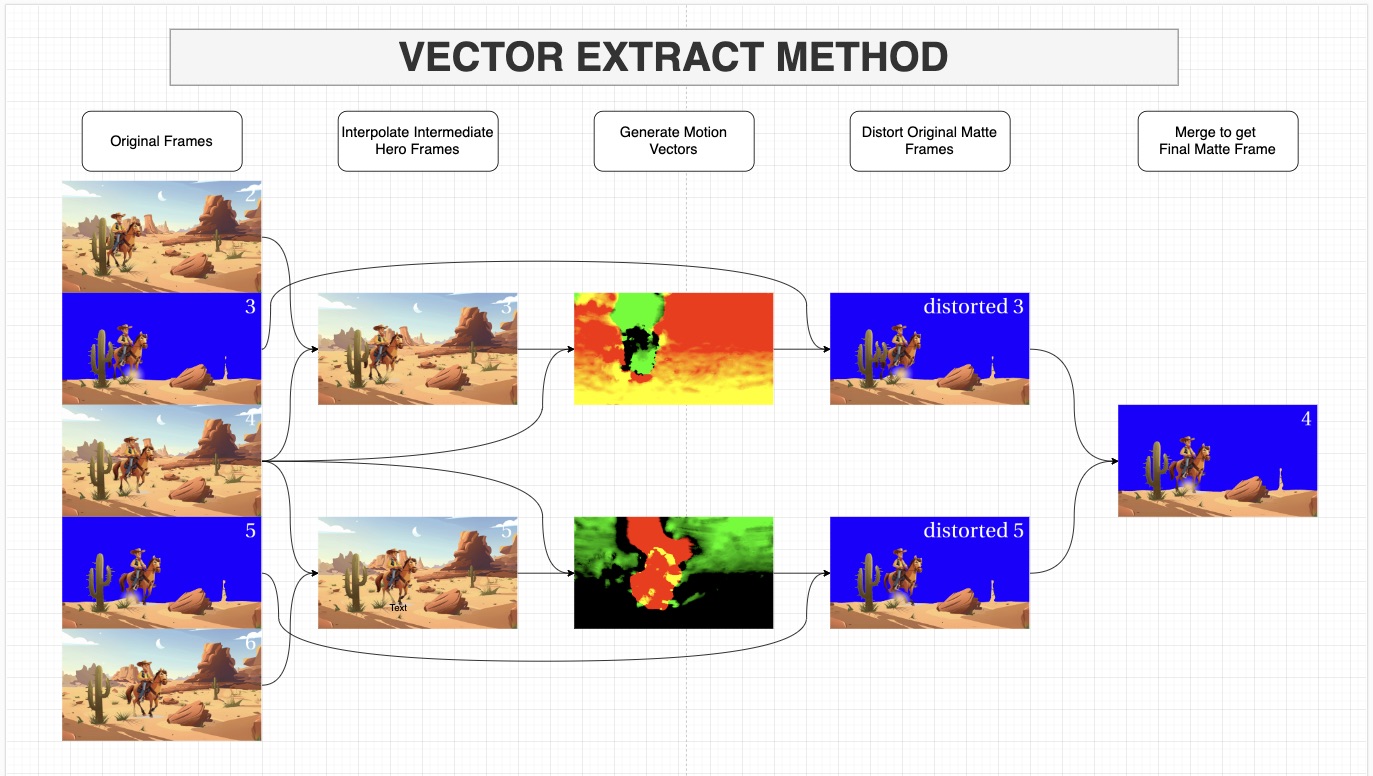
We’ll start by removing the matte frames with a simple retime node with speed set to 2. And then double the length of our hero plate. We’ll use Kronos to keep things fast and standardized.
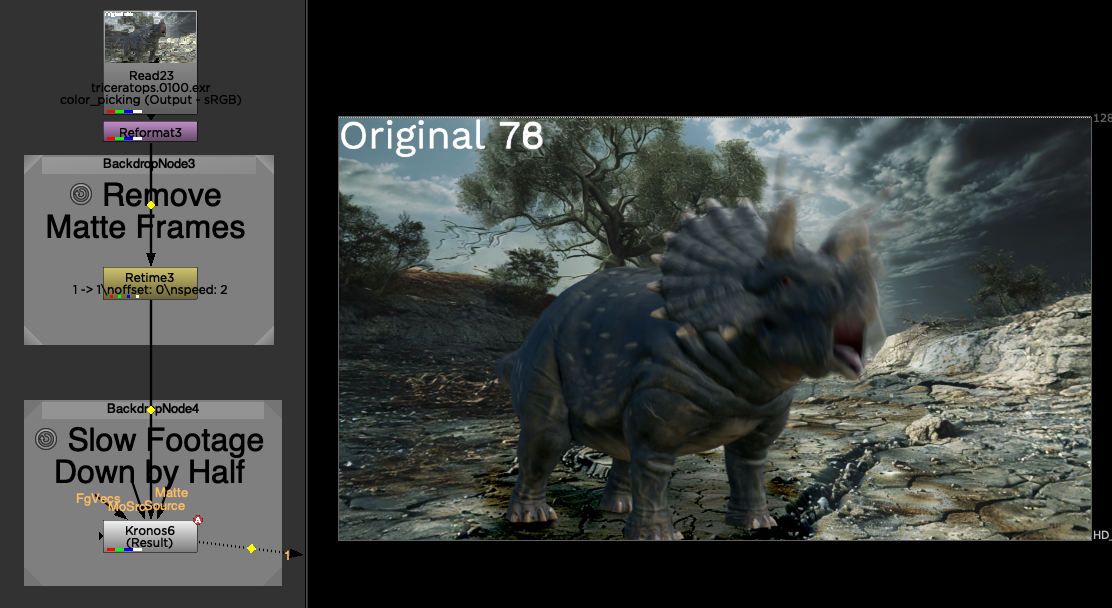
This will generate new frames that line up with our matte frames. The interpolated frames may be a little off as we saw with doing this just with the matte frames. But that’s okay because we just want the motion from those generated hero frames mapped to the actual real true non generated hero frame.
Note: Remember there’s a bug in Kronos and OFlow that requires us to explicitly set frame ranges and not just speed.
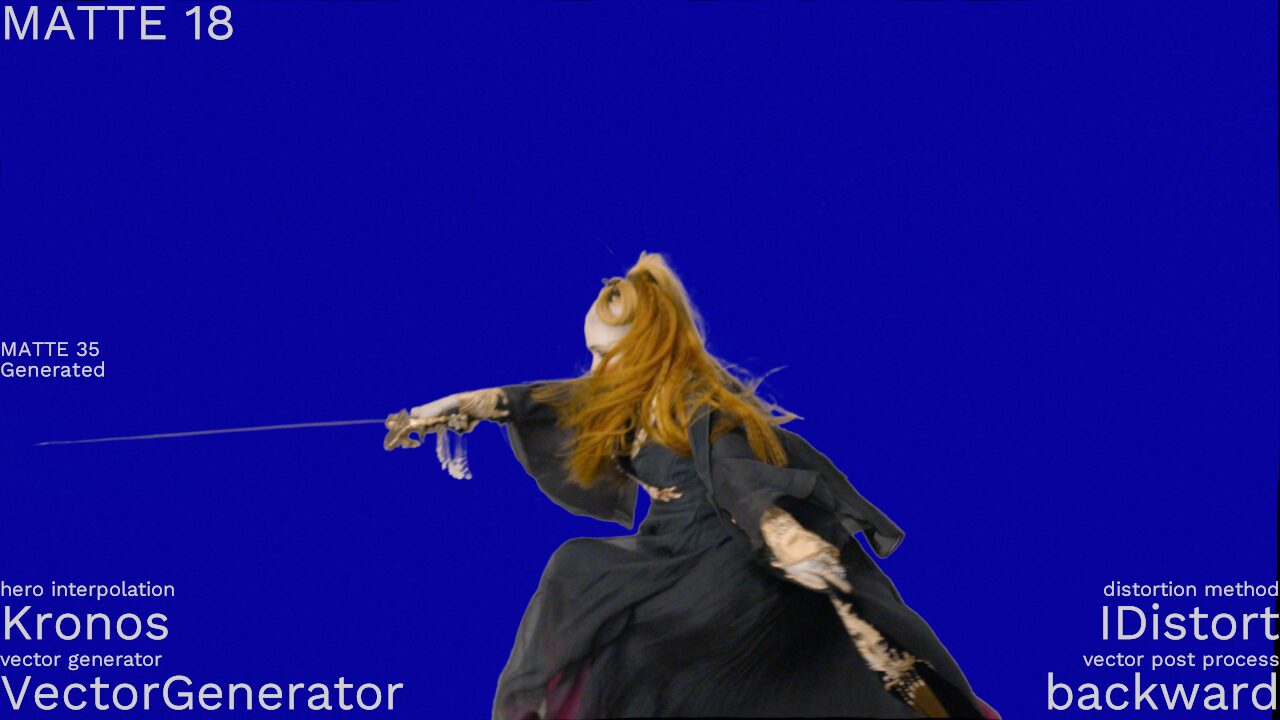
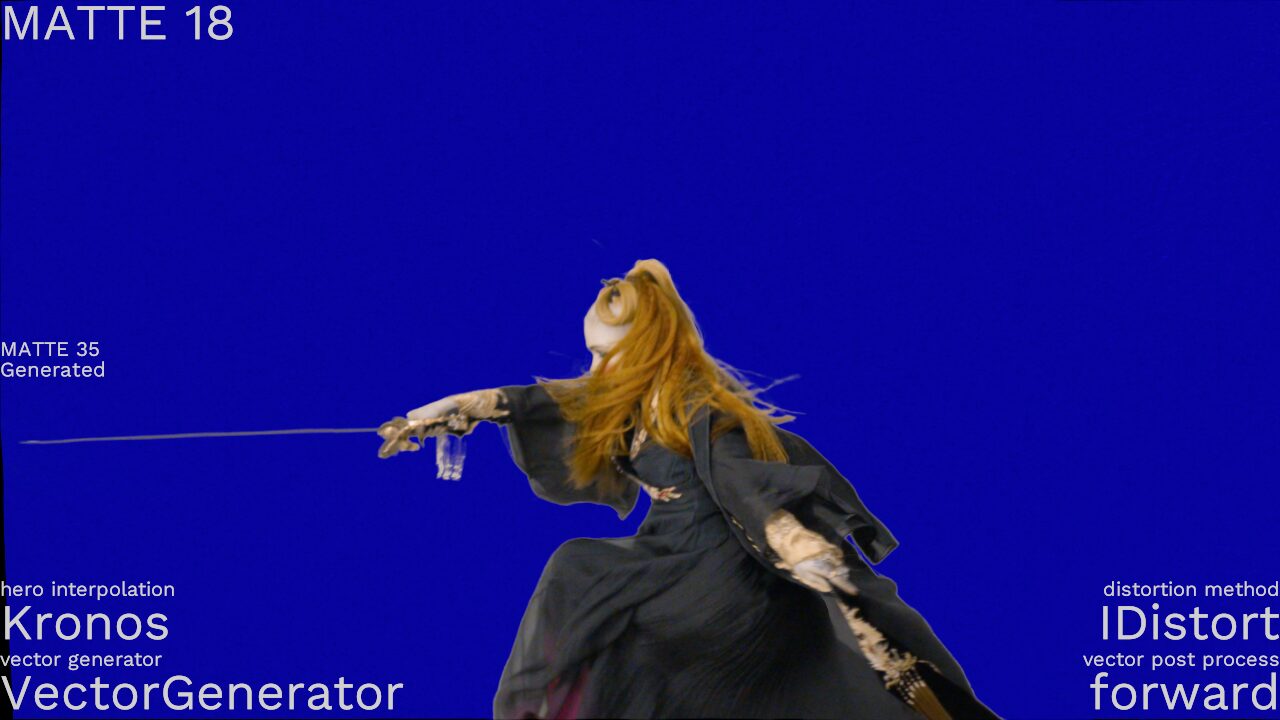
Now we get the backward and forward motion vectors at our hero frame. We’ll do this with VectorGenerator for now and consider some other options a little later.
Next we distort the previous matte frame with our backwards vectors and the next matte frame we’ll distort with our forward vectors. Comparing the two we get this.
If we average them we get this.
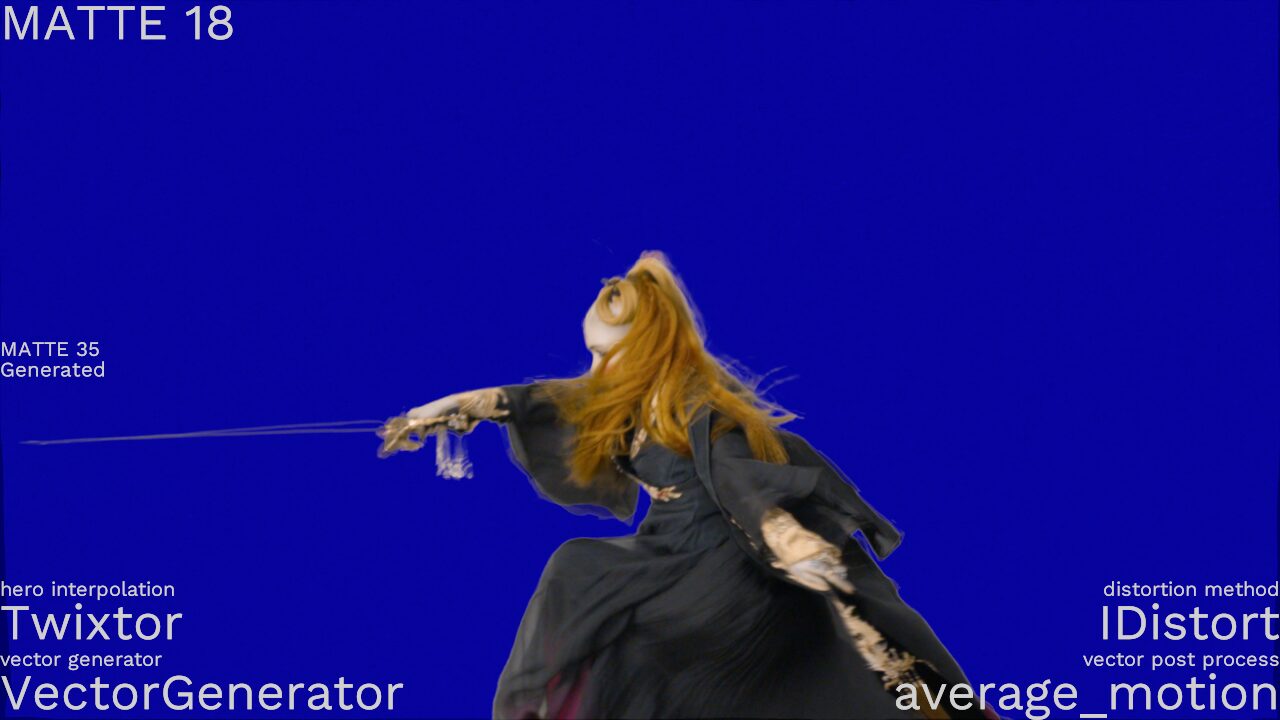
Not a super great result, but if instead of averaging them, we again use Kronos to blend the two frames together we can get something that’s much better. This is essentially creating another frame in between the backwards and forwards frames.
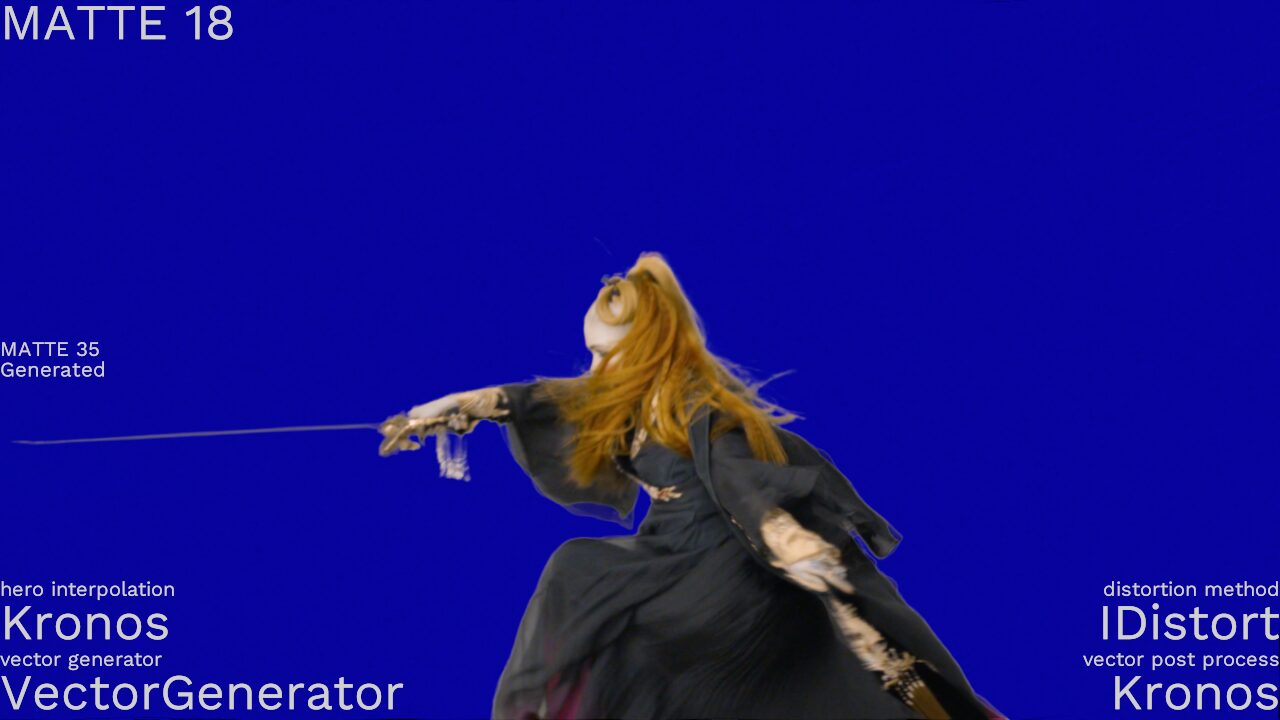
Our setup looks like this.
We can also fall back on OFlow and Twixtor.


If we really wanted to press our quality we could use Twixtor to do both the retime and the blend.
Also, IDistort isn’t the only way to distort our image using motion vectors. We could instead use an STMAP, though having played around with this, it doesn’t seem to do as good of a job as IDistort does. Don’t let anyone fool you, STMAPs are not a lower overhead way of doing IDistortion. They are just fine for lens distortions, but they shouldn’t be used as a replacement for legit motion vectors.
- ABME (Asymmetric Bilateral Motion Estimation for Video Frame Interpolation) has a vector generator. It’s pretty good, but terribly slow
- RAFT (Recurrent All Pairs Field Transforms for Optical Flow), which is also available in the Cattery, and much faster than ABME, but behaves very erratically.
- NNFlowVector is a paid plugin which looks like it has potential. Even better, it’ll generate motion vectors for free! But it was always giving me double images. I’m probably just using it wrong. I’ve still included in the gizmo and if I get it figured out I’ll update the gizmo.
There are a lot of options out there and depending on the footage certain ones might perform better than other. I’ve included all of these in the gizmo.
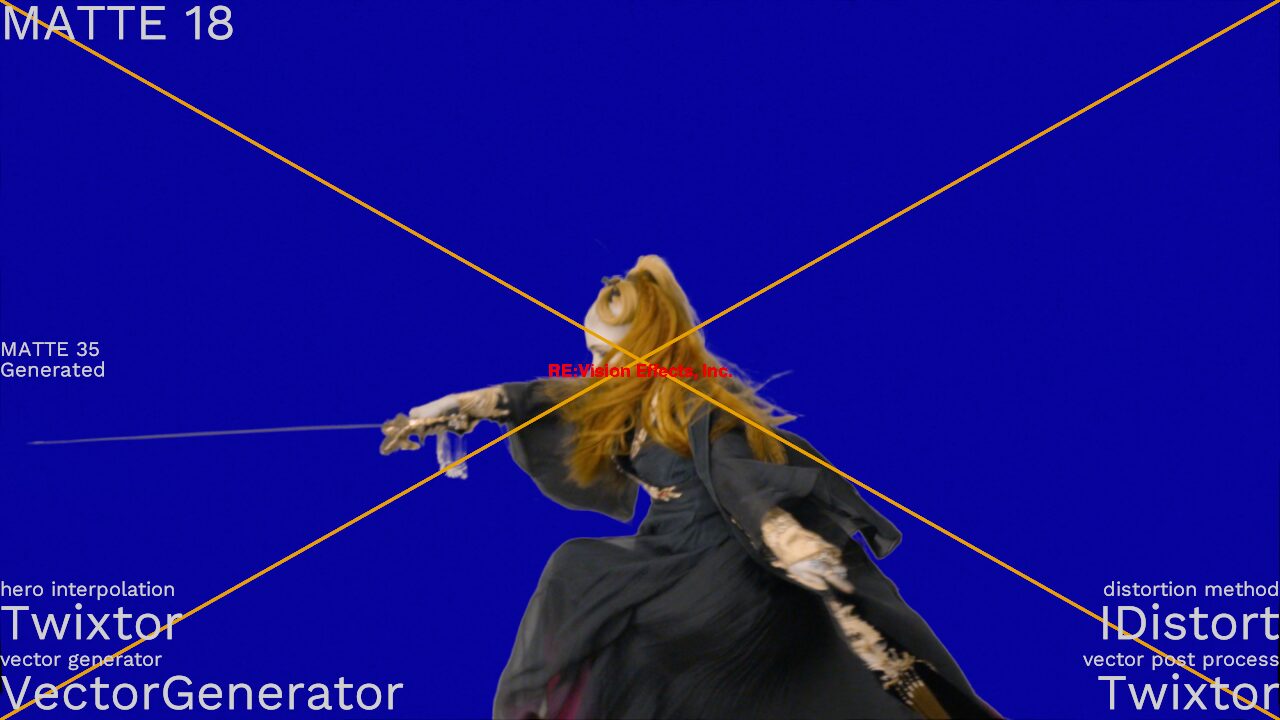
Examples
Let’s take a look at some examples. We already know that Twixtor does the best job interpolating footage. Using motion vectors also can improve our result significantly, especially when there is not too much motion in the background. Let’s take a look at a few examples.
Just for fun I generated some new footage for us to play with. The following are the original shots and then rendered in each possible interpolated way. And then 4 different ways using the vector extraction method. Feel free to download the test footage from Github and play with it yourself.
A quick composite of a stock triceratops and a render from Midjourney.
And here’s a photographer I cutout quickly using Resolves magic mask
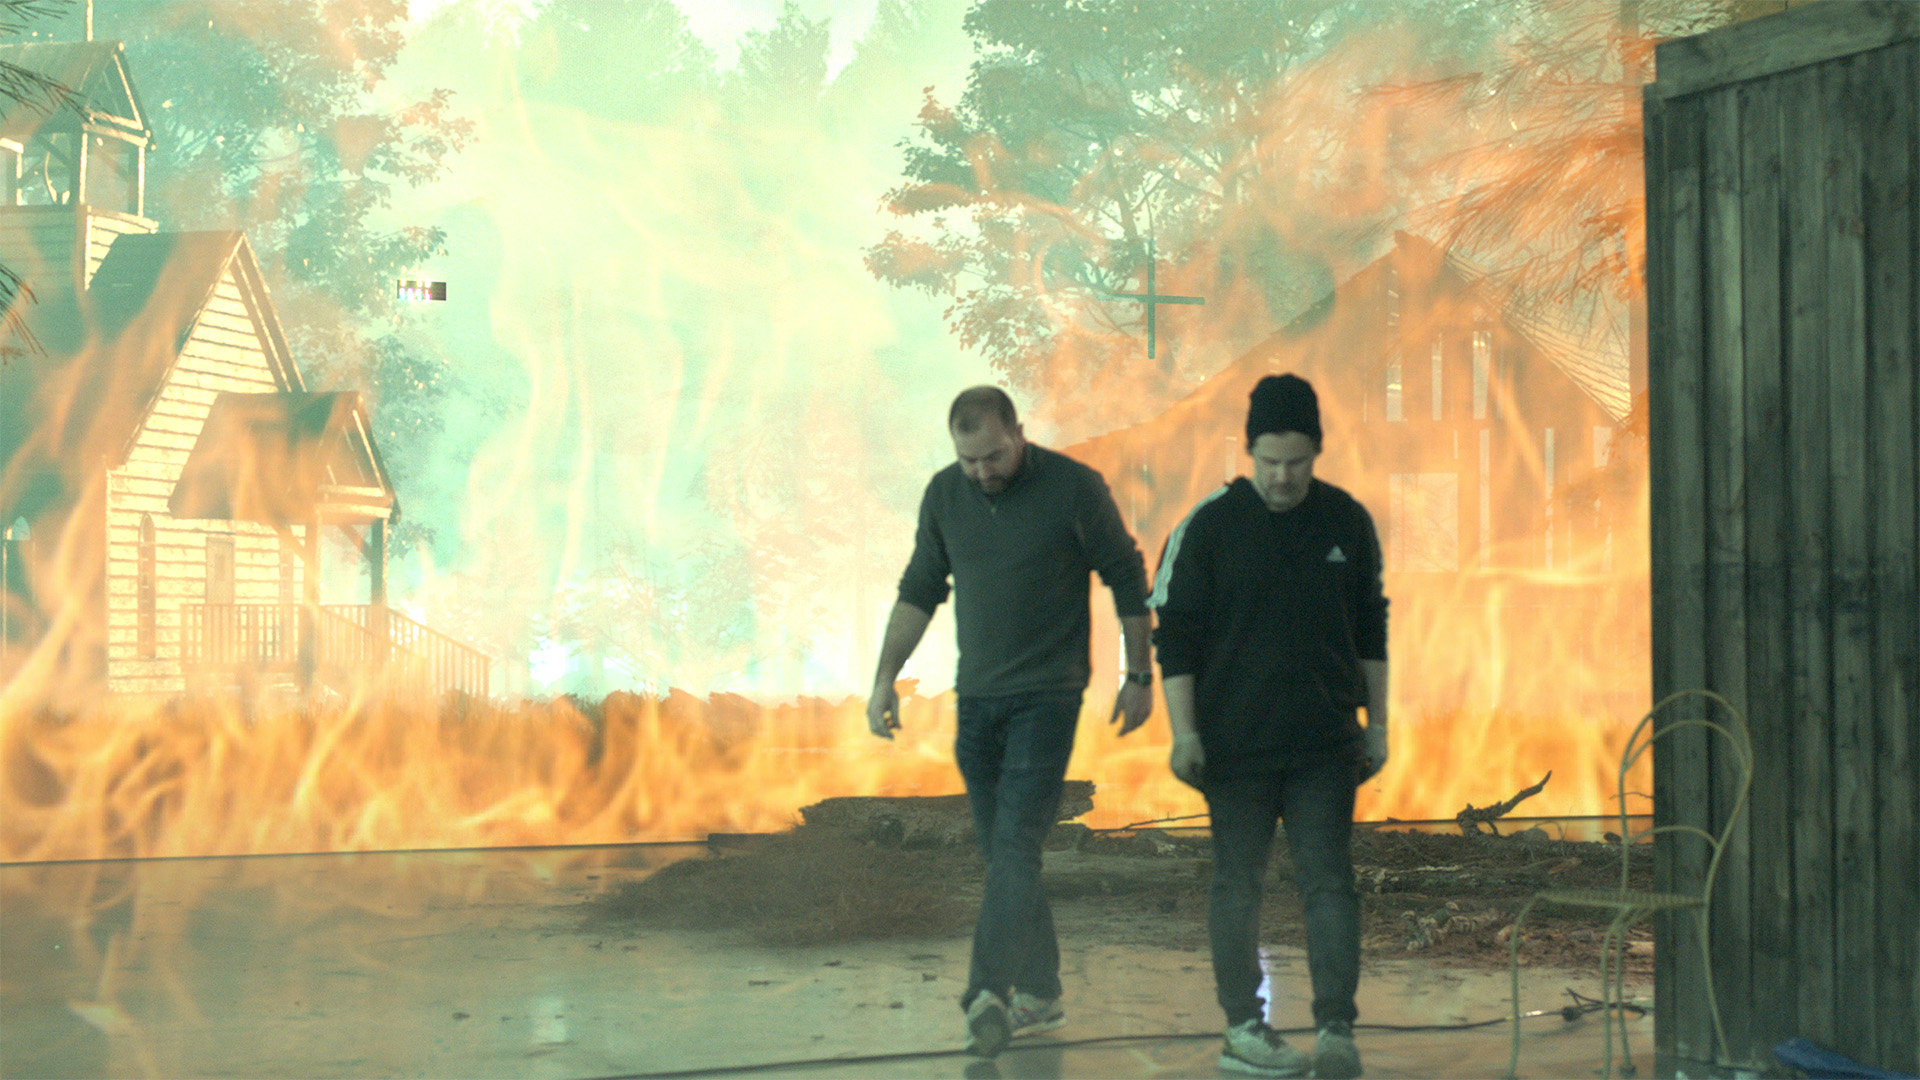
Some super duper high level 3D and compositing shot I made specifically for this project.
The Grimes shot we’ve been playing with.
And finally a few actual shots from the day of filming.
Conclusions
If I were jumping into a ghost frame job, I would 100% have the production company buy a Twixtor license. Probably on set I would just use interpolated Twixtor. But honestly Twixtor is so fast that going through the vector extraction method isn’t really that taxing. Regardless, between Twixtor and Kronos vector extraction, we’d probably get 96% plus of matte for free with a few tiny details here and there that need cleanup. That’s pretty good right?
Stay tuned for Part II, where we’ll dive deeper into the gizmo’s inner workings and how to use it effectively. But, in the meantime feel free to download it and check it out, make improvements, add more plugins, whatever. I love pull requests. Until then, happy compositing!